An Opinionated Guide to Fixie Commuters
Friday, November 4, 2016
Two months ago, I picked up a basic little road bike and turned it into a fixie commuter.
What's so great about a fixie?
They're simple
Fixed-gear bikes are way simpler than geared bikes. Reducing the number of moving parts on your bike means you have less stuff to maintain. Less stuff is liable to break.
When stuff does break, you have less cascading failures to fix before you can get back on the road. The last time I tuned up a hybrid bike, I had to clean the bottom bracket, replace and jerry-rig a new front chainring, and recalibrate the rear derailleur to get it working again. The last time I worked on my fixie, I replaced the rear cog and lubed the chain.
When you turn a road bike into a fixie, here's what you'll replace:
- Rear cassette → Single cog
- Rear derailleur → Nothing!
- Three front chainrings → One front chainring
- Rear brake → Nothing! (Aesthetics! If you want.)
- Front brake → Nothing! (Don't do this. You should really have a brake.)
They're romantic
I still feel that variable gears are only for people over forty-five. Isn't it better to triumph by the strength of your muscles than by the artifice of a derailer?
There is an almost mystical connection between a fixed-gear cyclist and bicycle: it feels like an extension of your body to a greater extent than does a freewheel-equipped machine.
Riding a fixie is a different experience. Pedal faster to go faster. You'll feel if your rear wheel slips on gravel because your feet will slip too. Get ready to spin your legs when you hit the downhill!
How to Convert a Road Bike
The easiest way to start riding a fixie is to buy an already-built fixie. The second easiest way is to buy a cheap vintage road bike and take off most of the parts.
You'll be looking for a bike with horizontal or mostly-horizontal dropouts. That's because you're removing the derailleur, which tensions the chain, so the only way to tension the chain is to move the rear wheel forward and back in the frame.
Here are the types of dropouts that will work and won't work to tension your chain:
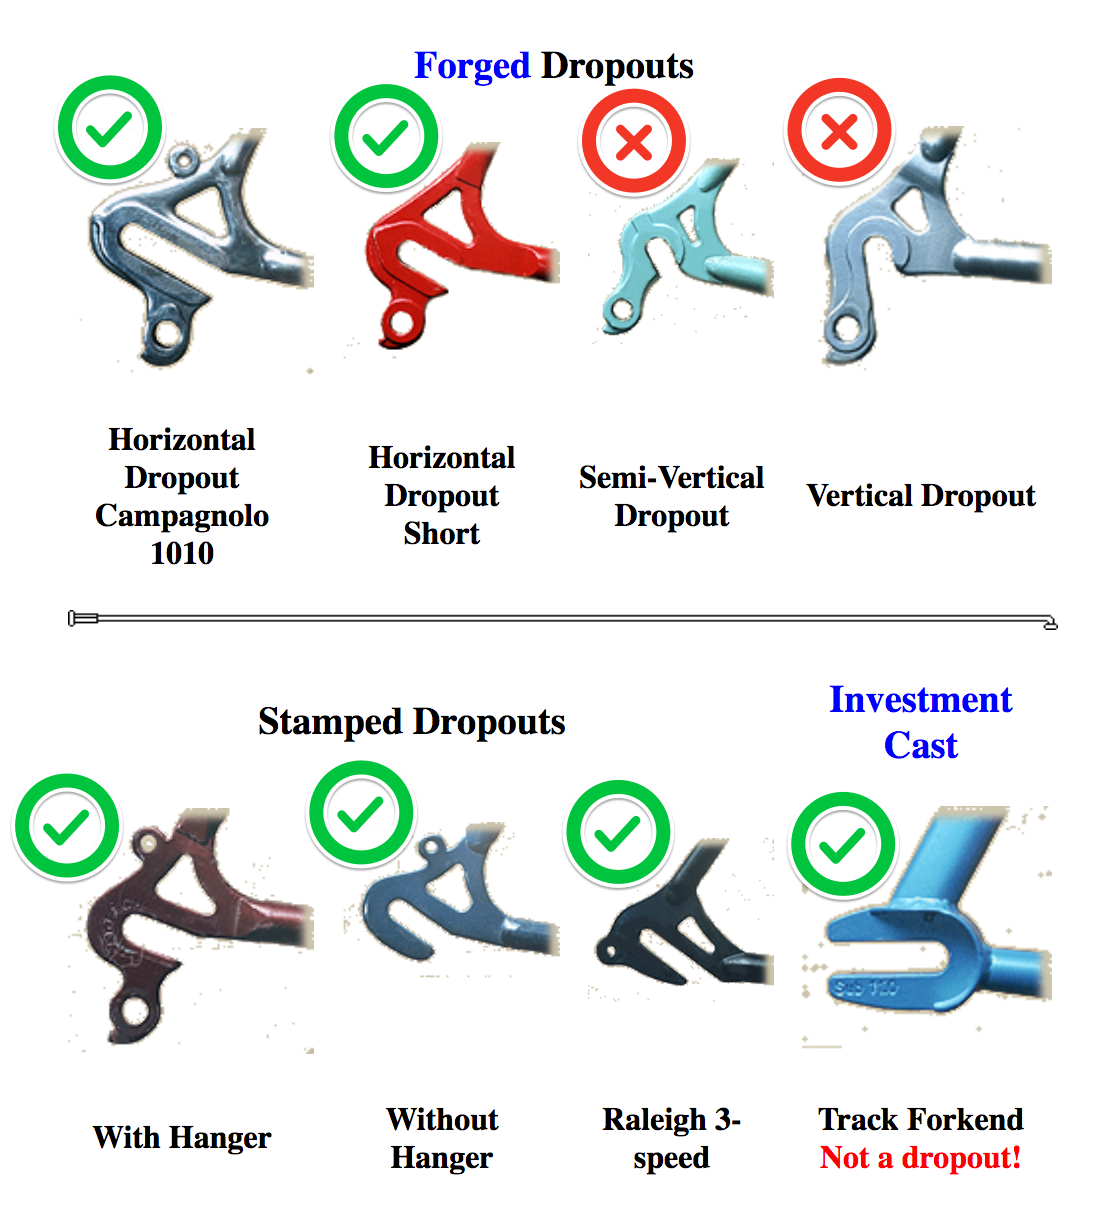 From Sheldon Brown's site
Strip the not-fixie parts
There are a lot of parts to strip! You'll need to remove these:
- Rear wheel (the entire thing)
- Front and rear derailleur
- Shifter levers
- Shifter cables
And optionally:
- Rear brake (if you want less stuff on your bike)
- Front brake (again, please don't. Keep the front brake.)
Take off these parts, one by one, and put them in a bin to donate to your favorite community bike shop. I gave mine to Bikes Together, an awesome Denver non-profit.
Resize the chain
Your old chain is too long for your fixie. You need to shorten it so that your chain is tight between your chainring and rear cog.
If you'd like to replace the chain, now is a great time. If you choose to do this, here's how to tell what width chain you have.
Replace one or both wheels
Your geared road bike's rear wheel has a cassette. This lets you change gears using the derailleur. It slides onto a freehub which lets you coast. You want neither of these things – you don't want your fixie to coast!
Instead, you want a rear wheel with a fixed hub and a single cog on each side. You'll often see these wheels called "flip-flop," "fixed-free", or "fixed-fixed." Flip-flop and fixed-free mean the same thing: one side has a fixed cog that moves the pedals with the wheel, and one side has a cog that lets you coast. Fixed-fixed wheels have a fixed cog on both sides.
If your bike has its original parts, it might still have 27" wheels. It's a lot harder to find modern tubes and tires for a 27" wheel than a standard road bike 700c wheel. So now is a great time to upgrade to a 700c rear wheel. And as long as you're at it, you might as well replace the front wheel as well.
Don't forget long-reach brake calipers: The radius of a 700c wheel is 4mm smaller than that of a 27" wheel. This means your brake pads will have to reach 4mm farther to make proper contact with the rims.
Your existing calipers might not have 4mm of wiggle room to work with your new wheels. Make sure to check before you buy. If you need more reach, there are several options available for long-reach brake calipers.
Get new tires and tubes
Hooray! Your new wheels are here. Now you get to experience the candy shop that is tire selection.
There are a couple of factors that all trade off against each other when you're buying tires:
- Flat protection: Heavier, more armored tires can roll over sharper stuff without damaging the tube inside.
- Rolling resistance: Heavier tires have more rolling resistance. This saps all your precious forward momentum and means you spend more energy going the same distance.
- Agility: Some tires are more nimble around corners and in slick conditions than others.
- Weight: More weight generally correlates to more durable and longer-lasting. It also makes you slower.
- Price: You get what you pay for. Cheap tires won't be good at anything listed above. But even expensive tires will wear out down the line.
To find a tire that's best for you, check out Rolling Resistance reviews. They cover all the tradeoffs of every road bike tire you should consider.
Replace the ancient brake levers and bar tape
Vintage brake levers and cables look like this:

If your bike comes with these, they are probably original and they probably really suck at translating hand pull into braking action. And if you're like me, you want to minimize the exposed cables on your clean frame.
I like it when my cables pop out from under the bar tape:

Consider buying road bike brake levers so you can safely ride on the hoods, and a crosstop lever if you ride on the tops a lot.
Once you have those, you need to install the levers, then wrap the bars over the brake cables. Although it can be nervewracking, this is actually a lot of fun. Find a color you like at your LBS or online and buy twice as many rolls as you need. That way, if you screw up, you can just try again.
Retent yo foots
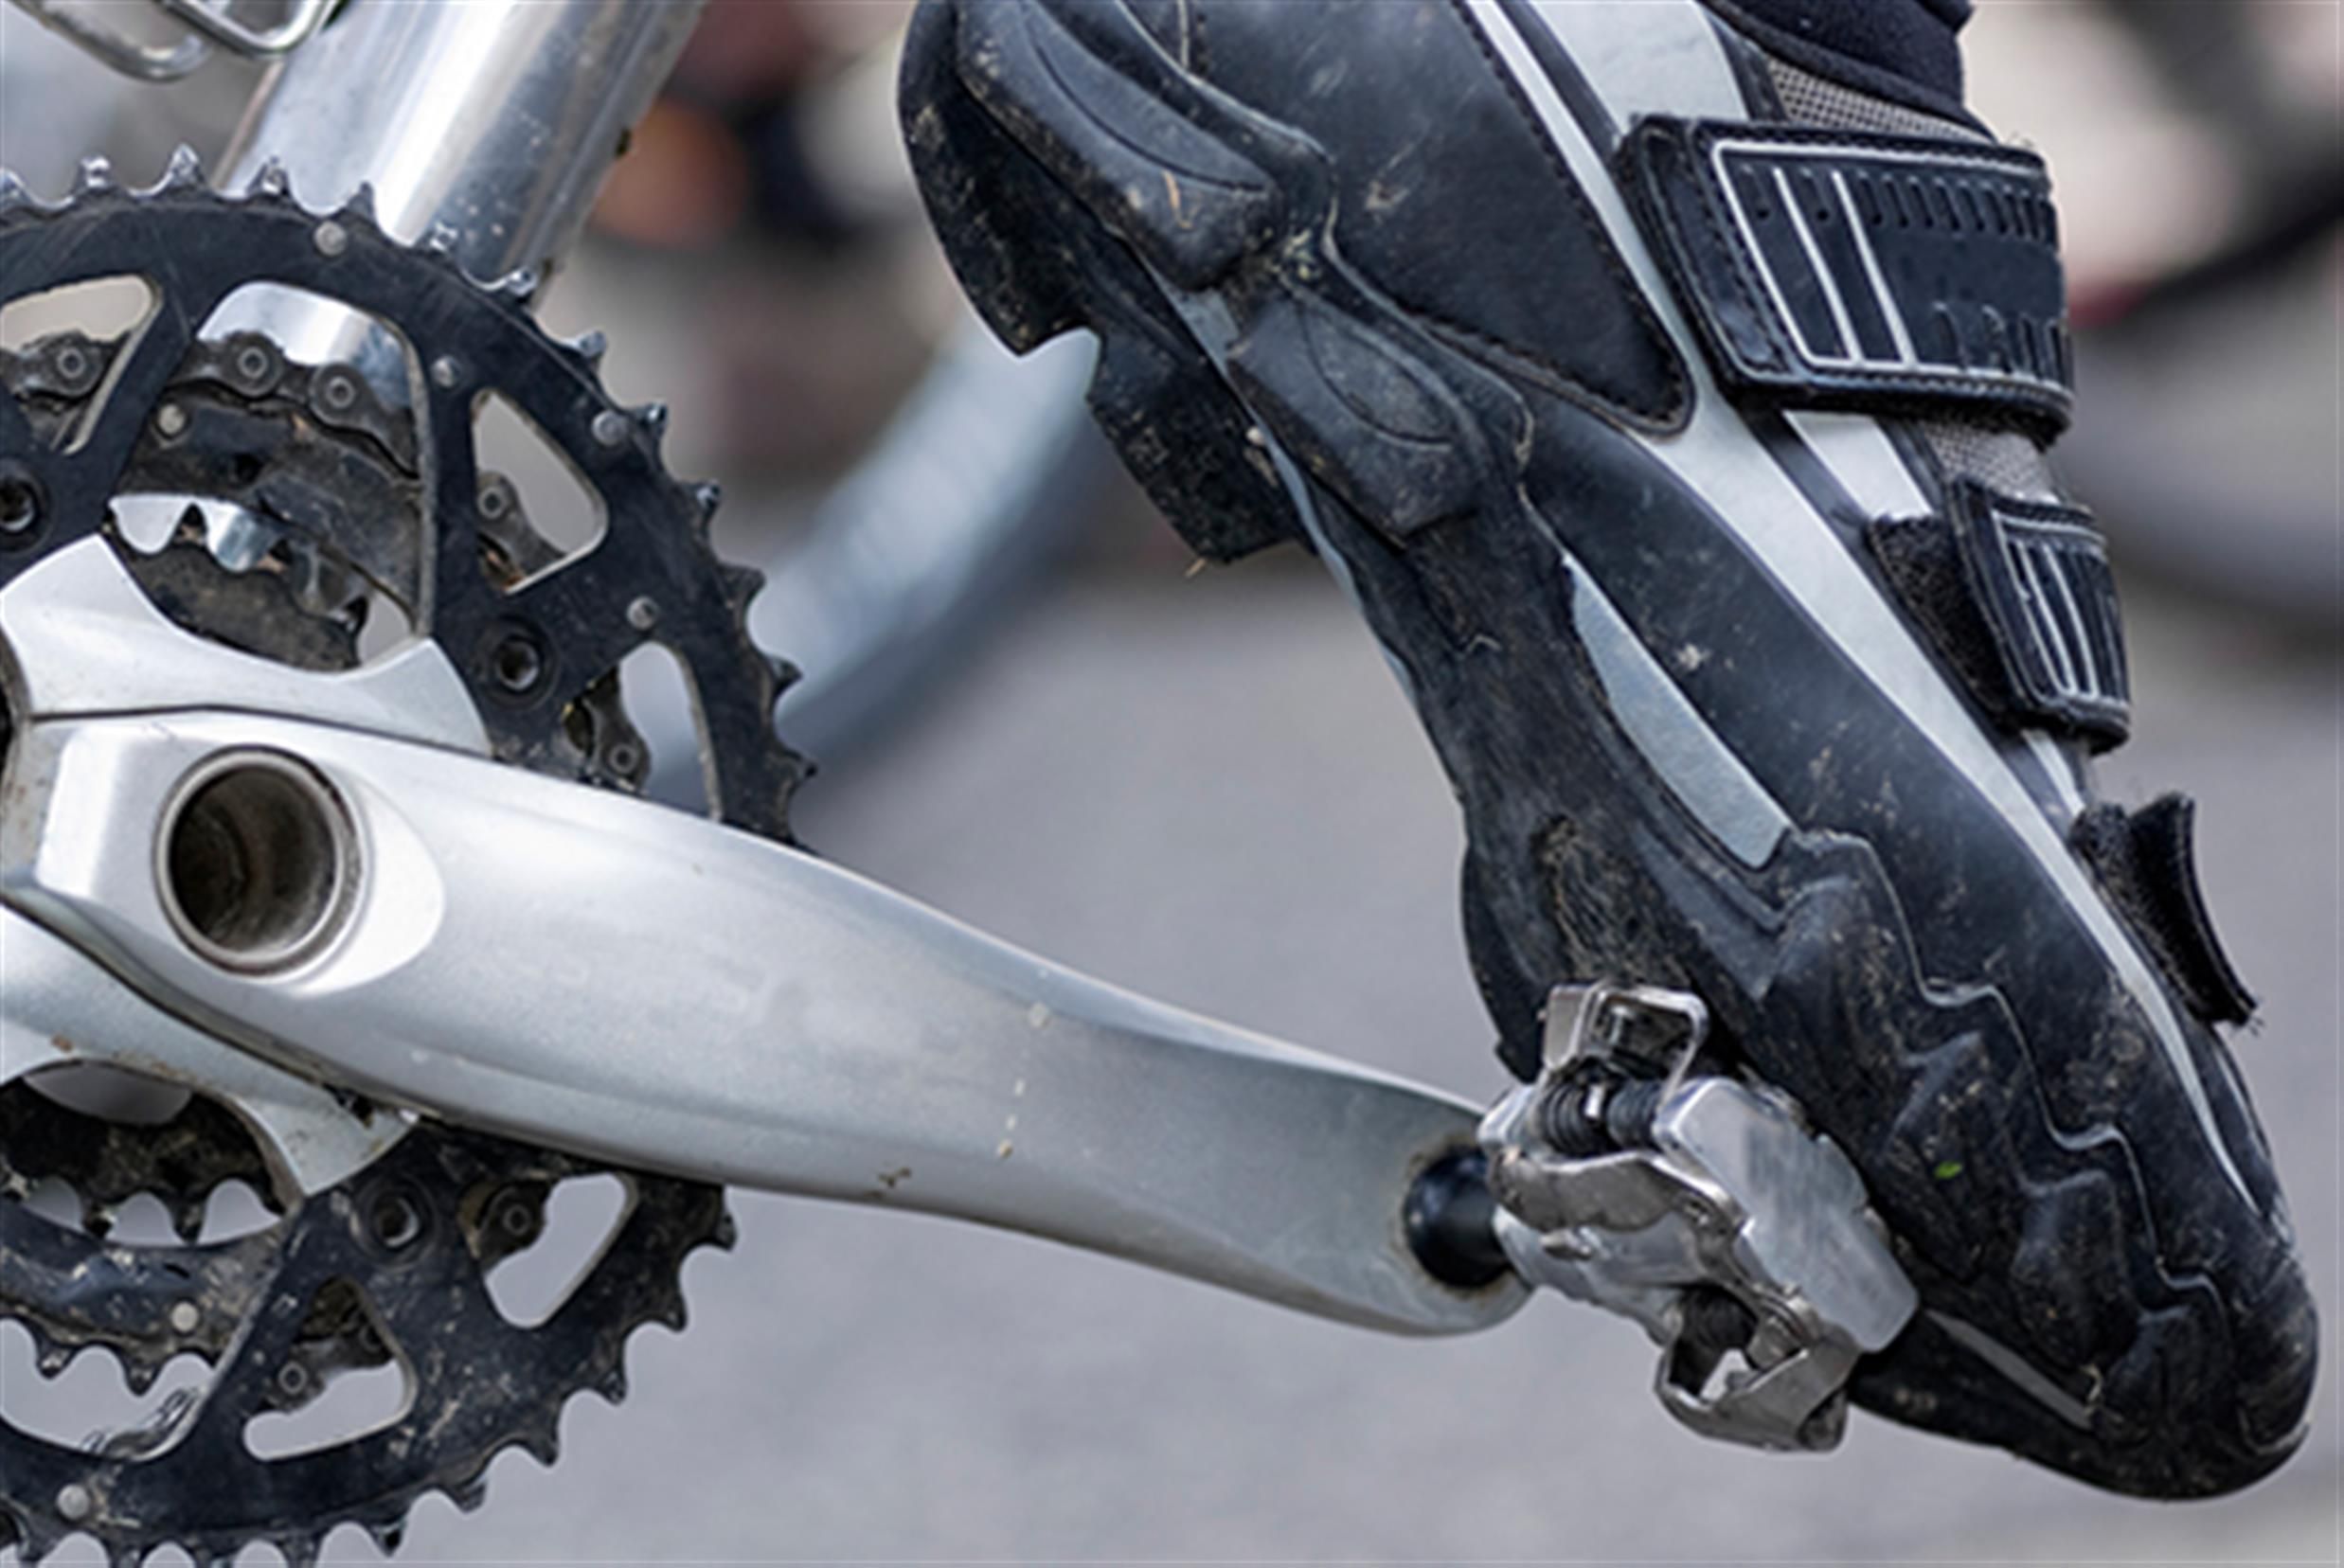 From Cycling Basics: How to Cycle with Clipless Pedals
Foot retention does two important things:
Keeps your feet glued to the pedals. You can't coast on a fixie. Your pedals move when your wheels do. If your feet slip off the pedals while you're moving fast, it will be really hard to get your feet back onto the pedals. That's a recipe for a crash.
Lets you pull up for more power. You only have one gear now – time to make it count. When your feet are bound to the pedals, you can pull up with one foot while you press down with the other. This lets you apply more force and means you don't need a higher gear as much.
Going up a hill? Focus on the pull of your back leg – your body will naturally place weight on your front foot. It's like a magic sixth gear you never knew you had.
Pulling up and cranking hard with both feet also helps you start from a dead stop. It's very convenient when you're in the left lane at a light that just turned green and you want to keep the drivers behind you happy.
What's a clipless pedal?
Confusingly, a clipless pedal uses a metal clip mounted to your shoe to hold your foot to the pedal. The pedals are shaped so that they latch onto the clip in your shoe.
To clip in, you simply step into the pedal with the clip in your shoe. Slide the toe side in, then step down until you hear the click. To clip out, rotate your ankle outward away from your bike.
There are two main types of clipless systems.
Off-road systems use small clips that make it easy to clip out. Lots of casual shoes offer recessed mounts that let you walk around without crunching your clips against asphalt.
Shimano SPD is the most popular off-road system. Other competitors are Crank Brothers, with the egg-beater design, and Speedlite with the hockey puck pedals.
Road systems use large clips. They are intended to retain your feet with more force. Their larger contact area lets you transfer power more efficiently to the pedals for long rides and races. Popular road systems include SPD-SL, Look, and Time.
If you don't know what you need, start with the Shimano SPD M520 pedals. Then search for some classy, walkable SPD shoes and go from there.
What are my other options?
Toe clips are metal or plastic cages that surround your toes. You can use normal shoes in toe clips. You just slip the front of your shoes in and pedal normally.
Toe straps are velcro straps that fit around the front of your pedals. Slide your feet through them, pull them tight, and velcro them down. They're more secure than toe clips, but they're harder to bail out of in a crash or at a stop light.
Platform pedals are what you find on most peoples' bikes. They're flat on both sides. They don't come with straps, clips, or cages on their own. I don't recommend you use platform pedals without additional foot retention.
Enjoy your new old bike!
Practice safely! Learn to clip in, clip out, and spin before you take this on your daily commute. Everyone has the embarassing sideways slow fall when they come to a full stop but forget to unclip in time. Try to get that out of the way at a park before you end up doing it at a stoplight.
I'd love to hear what you think about this post. Email me or @ me on Bluesky!